
BlackVue DR750S-2CH WiFi Guide
The direct WiFi connection is an excellent convenience feature on the BlackVue DR750S-1CH and DR750S-2CH. This is not to be confused with the BlackVue Over the Cloud which offers additional features which require internet connectivity. The direct WiFi does not require cellular data as it is just a local connection between the phone and dash cam. You just need the Android or iOS app and a WiFi enabled device to use it.
What's new with the DR750S
First, let's cover what's changed between the old DR650S and the new DR750S. According to BlackVue, despite having larger file sizes due to higher bitrate, the DR750S download speeds over WiFi are faster. For anyone coming from an older BlackVue device, it's also important to note that the default password is no longer BlackVue. The new password will be device specific and can be found on a sticker underneath the front camera mount along with your SSID and cloud code. This provides improved security compared to having the same password across all devices, especially when considering WiFi is always on by default.

Smartphone App
To use the Direct WiFi feature, connect your phone to the camera's wifi network and then choose "BlackVue Wi-Fi" in the app. The main menu is the same as the DR650S. There's a list of video files that you can filter based on recording mode, a live view option on the bottom, and firmware settings on the top right. If you would like to play any of these videos, simply click the file name. Alternatively, if you want to download it to your phone's hard drive, click the options and choose the "copy to internal memory".

Firmware Settings
You can access the camera's firmware settings by clicking the gear icon on the home page of the WiFi app. This lets you customize your dash cam to your preferences. On the top of this page you'll see your firmware version number. Remember that if you change any of the settings in this app, you'll need to hit the save and close button to properly apply your settings. This will also restart the dash cam so you will be disconnected after clicking it.

Basic Settings
The basic settings should be the first settings you go through when you first set up your dash cam. With the DR750S you need to set the time based on GMT time zone. If you are unsure of your time zone, you can look this up online by searching your city and time zone in Google. You can verify that the time was set properly by looking at the live view afterwards. Do note that changing the time zone will require a format so make sure you don't have any important videos before you change this setting.

Under the recording settings, we recommend turning on the "lock event files" option which will give you the new event partitioning feature for the DR750S. We also recommend turning on the overwrite feature for this partition, otherwise it will get stuck when it reaches 50 files. You can also change your speed display unit or turn it off altogether under the recording tab.
Lastly there are the video settings. Generally speaking we like to leave these at the default which offers the 1080P recording @ 60 frames per second. If you find that the night time video is too dark, you can enable the night vision feature. Another new setting is the fact that the front and rear brightness can now be set independently.
Sensitivity Settings
Under this menu you can change your g-sensor and motion sensor sensitivity. The motion detection algorithm has been revised for the DR750S to reduce the number of false triggers and we find that the default setting works quite well. If you only want your parking mode to trigger by the G-sensor, you can turn the motion detection to 0. With the G-sensor, we typically leave the parking mode setting to the default but the normal mode typically needs to be turned down. In our testing, we experienced a lot of false events in driving mode using the default setting.

System Settings
The system settings name isn't very specific but there's actually some pretty handy features in here. The first one to look at would be the LED settings, for our personal use we like to turn everything off except for the recording status. That way the dash cam is very discreet but you can still see that it's recording properly. The proximity sensor setting refers to the touch sensor on the left side of the camera. This can be set up to turn voice recording on and off but we prefer using it for manual recording. With the new event partitioning feature, you can essentially use this as a manual event button. If you find the camera is too talkative, you can also turn off specific voice alerts and turn the volume down.
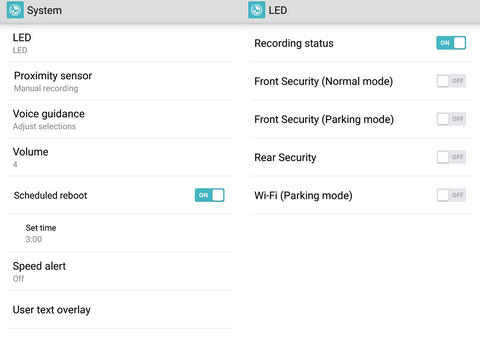
One innovative feature that's enabled by default is the scheduled reboot function. This will turn your dash cam off once every night to make sure it runs smoothly. You can change the time at which it does this reboot or turn the feature off altogether if you don't like it.
Cloud/Wi-Fi Settings
In the cloud settings you can program your wifi hotspots and set up what notifications to trigger via cloud. You can also turn off the cloud feature altogether which will also allow you to auto turn off the WiFi. If you don't plan on using the cloud, we recommend doing this as it will extend your parking mode recording time since the power consumption will be lower. If you want to change your camera's WiFi SSID or password, you can do so under the WiFi menu as well.
